Saturday 27 August 2016

Open Sesame: RFID, Door controller and some electronics

Controlling access to your organisations premises and to security zones within them is an important part of an Information Security Management System. Access control is part of the PCI DSS and ISO27001 and the subject of access control is part of the CISSP from the (ISC)2 Common Body of Knowledge. Access to facilities should be based on the principles of business need to know and least privilege; all those that need access should have access and they should only have the level of access they need to do their job. It is a requirement of most standards that access is controlled and logged and there is a range of solutions from Security Guards to sophisticated ‘mantrap’ entry portals.

A requirement of access control is that it should be proportional to the risk and impact; be transparent to the users whilst meeting the requirements of the company in terms of compliance.

Increasingly these days technology is being deployed to provide the solutions. Biometric solutions are not always transparent to the user, provide the level of convenience required and can be costly, mechanical locks such as cypher locks are also not transparent enough to the user or convenient and it can be difficult to change keys or codes and distribute the news across an organisation in timely manner, it is not a solution that scales well. A popular solution is the contactless entry card system that is based on Radio Frequency Identification (RFID) or Near Field Communications (NFC) technology. Such systems allow organisations to distribute key cards or tokens to employees and trusted 3rd parties and individual credentials can be revoked without affecting the whole population of users. Being wireless based the cards or tokens only need to be in proximity to the reader provider high levels of convenience whilst provider unique identification and accountability with entry and potentially exit logging.

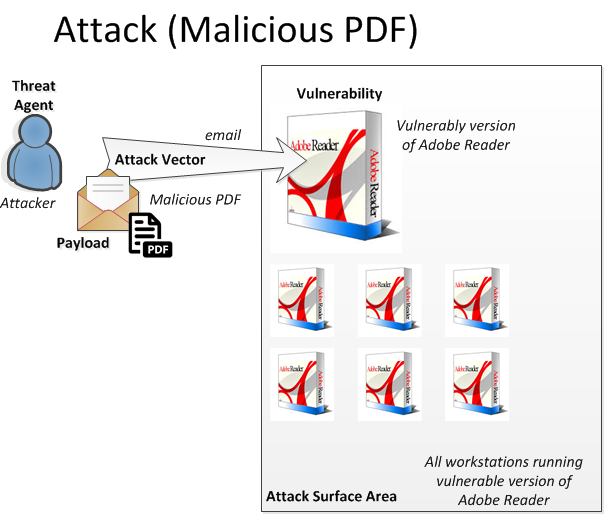
Such systems can be easily purchased from eBay, Amazon to various system installers and can vary from individual door locks to enterprise systems. Those systems that rely on wireless communication to provide identification and authentication whilst being convenient and transparent to users are also subject to attack due to the nature of wireless communication being able to be intercepted and some systems being designed in an insecure manner.

Since April 2014 as part of talks that I have been giving to branches of the BCS and at universities and for other organisations we demonstrate attacks on door access control systems.

The demonstration shows 2 types of attackers on the door access system.

  • Compromising the door controller
  • Attacking the tokens


The door controller was purchased from Amazon and using information obtained by Googling components and other information it was possible to compromise the system in a number of ways.

Compromising the door controller


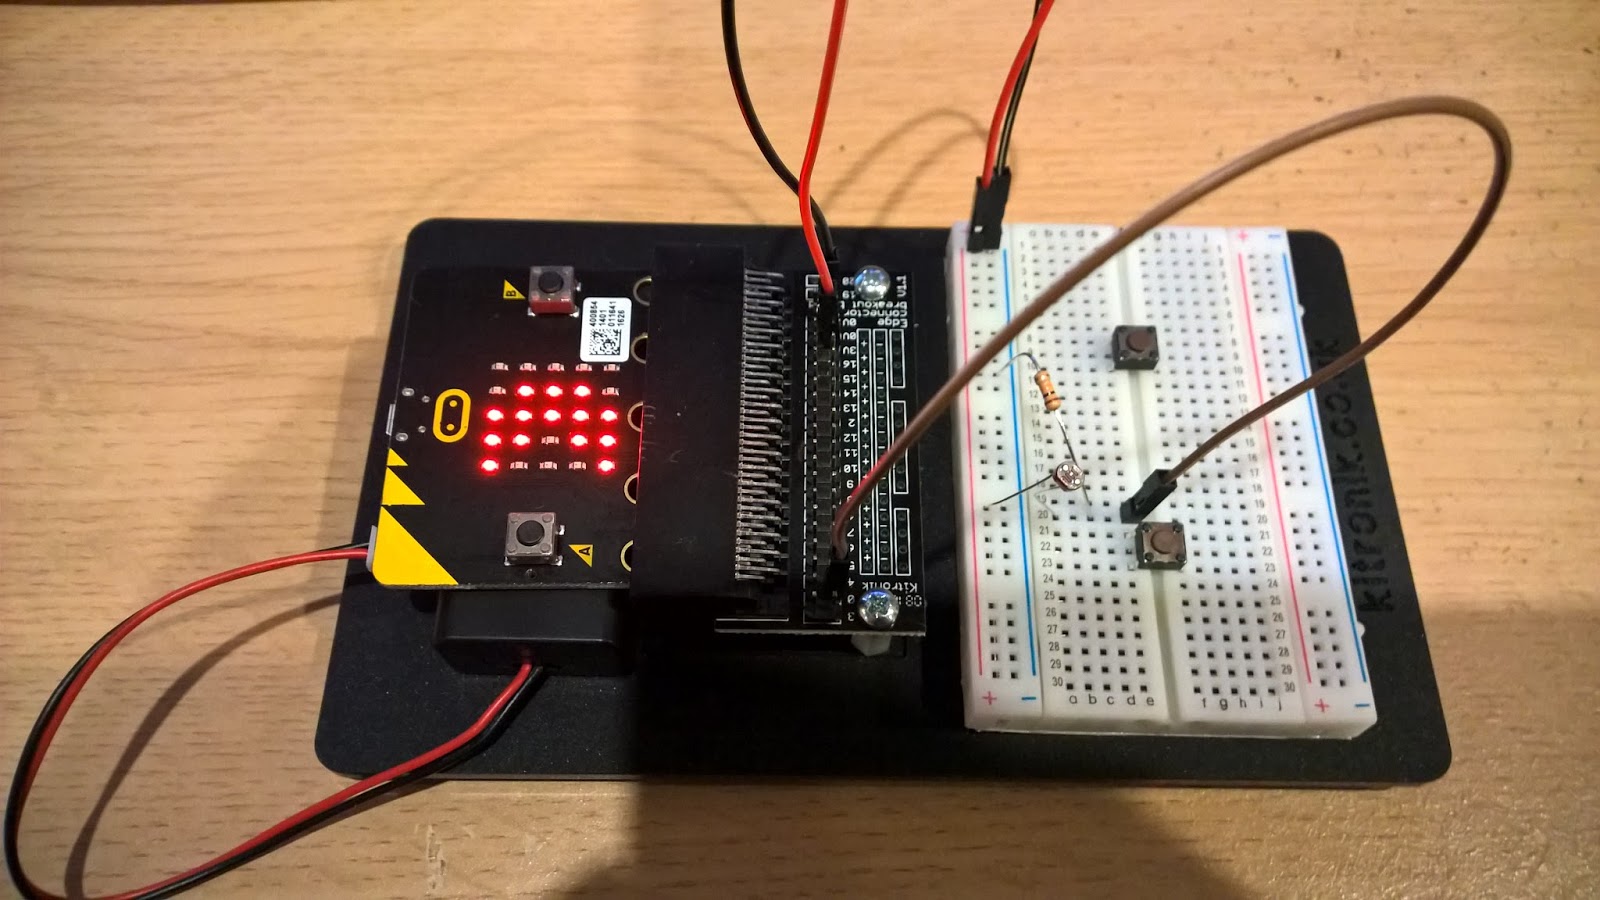
In this attack physical access to the door controller is required in order for the access codes to be captured. The proximity door controllers have a number of elements.
  • RF circuit
  • Micro-controller
  • Door latch controller
In the attack we demonstrate we intercept the signals from the RF circuit as they are being passed to the Micro-controller allowing us to read and capture authentication codes transmitted to the door controller so that we can then record and replay them back to the controller at a later time or use them in a cloned token.

By soldering some pins to the circuit board it was possible to capture the stream of binary data from the RF circuitry. Initial work was done with an Arduino, however small systems such as the Teensy could be used.


It was possible to capture the codes which could be stored or if a wireless adapter was added to the system they could be transmitted to a nearby laptop.

A small enough device could be attached to a controller and the controller then fitted back on the wall and the compromised controller could be used to capture legitimate users access tokens allowing them to be used in an attack.

Attacking the tokens


Proximity door controllers work by having a microchip connected to a coil, when the coil is moved through a magnetic field it generated a voltage which powers the microchip which then modulates a signal through the coil which can be picked up by the receiver which generated the initial magnetic field.

It is possible using simply electronics and a micro-controller like an Arduino to replicate either the access controller or spoof a token.


In the attack we demo, we do both. A coil, simple electronics and an Arduino are used to simulate an access controller. Any token in range of the spoofed access controller will transmit their codes which can be recorded by the Arduino.

The exactly same circuit can then be used to spoof a token and replay the captured codes back to a genuine door controller allowing a user to be spoofed and the door controller to be tricked into opening. By using a micro-controller board, it can be programmed to use the captured code as a base for a brute force attack on all tokens by transmitting modified codes and seeing if the controller responds.

Conclusion


These are simply attacks that work on unsophisticated controllers; however the principles can be used for more sophisticated attacks that would work on more advanced controllers. Unless a system has been designed with security in mind it is often easy to attack those systems.


Sunday 7 August 2016

Micro:bit programming

As a bit of an update to the BBC Micro:bit post from the 6th August 2016

In the post I mention some resources for programming the Micro:bit, here I have added some additional resources.

The Micro:bit SBC can be programmed from applications running within a web browser
Additionally there is an App from Samsung to programme the Micro:bit from an Android phone 
For the Apple fans


Also Microsoft are developing a Windows 10 App to access the Micro:bit

Additional resources


Lancaster University have a number of resources on using and programming the Micro:bit, they are responsible for creating and writing the BBC micro:bit runtime. And have C\C++ tools that can be used to programme all the features of the board.

ARMmbed are also a partner and have resources that work with the other partners including Lancaster University


As I find other resources I will update this post

Saturday 6 August 2016

BBC Micro:Bit

As part of looking at the capabilities of the BBC Micro:bit Single Board Computer (SBC) I have put together the following using the Inventor's kit from Kitronic.


BBC Micro:bit (Display side)

BBC Micro:bit (Component side)

The board can be programmed from applications running within a web browser

The Inventor's board adds an easy interface for a breadboard and comes with 10 tutorials

Kitronik Inventor's kit
One of the tutorials in the kit is an experiment that lights different colour LED's as a capacitor charge as per the table below. The rate of charging can be varied using a potentiometer and there are two switches that enable charging or discharging of the capacitor.

LED
Charge capacity
Red
25% -> 50%
Orange
50% -> 75%
Yellow
75% -> 90%
Green
90% -> 100%

Capacity charging experiment
The experiment whilst fine as is, could be improved and here are my improvements.

Improvement 1 - Monitor discharge


The experiment is about charging, but if the circuit is left the charge leaks from the capacitor and the percent charge drops, however the current programme does not show this discharge and the LED's don't turn off until the second switch is pressed and the capacitor discharges.

I modified the supplied programme to reflect this allowing the monitoring of charging and discharge to take place.

Modified Touch Develop Script

Improvement 2 - Adding serial data


The first improvement is not exactly rocket science but adds an extra element in the experiment to demonstrate charging and discharging of the capacitor.

The BBC Micro:bit can output serial data to to a host PC via the USB connection. It requires a drive from mbed. The instructions can be found on the coding the microbit site

You must install a device driver (for the computer to recognise the serial interface of the micro:bit); then, you must also install a terminal emulator (which is going to connect to the micro:bit and read its output).

Follow the instructions at https://developer.mbed.org/handbook/Windows-serial-configuration to install the device driver.

ARMmbed are partners with the BBC on the Micro:bit project.

The connection from any terminal can be created using the following settings
  • Serial port : COM port that says “mbed Serial Port”
  • Baud rate: 115200.
Any terminal will then list the data being sent from the Micro:bit

Selecting serial port

Setting baud rate

Viewing the data
To get the Micro:bit to send the data a new application was written. Using the Code for Microbit site and the block editing tooling available on it, each time led.plotBarGraph is called, the value is also written to the serial output.

CapacitorChargeSerialSend application

If you are using Chrome their is an easy way to capture the data within the coding tool.

You can use the Micro:bit extension to get serial data streaming in the editor.

  1. Install the Extension for BBC micro:bit on the Chrome Web Store.
  2. Restart Chrome and open the web editor
  3. The serial data will show below the simulator

Microsoft Micro:bit extension

LogView

The log view will automatically start to collect and organize the data it detects. Simply click on the log view to open the various options to export the data. The simplest option is to download the data as a CSV file. This file can easily be opened in programs like Office Excel.

In the data export dialog, there is another option to upload the data to the Azure cloud. This allows to upload small amounts of data without any kind setup. The data can be accessed via web services or directly from Office Excel.


Captured capacitor charge / discharge curves

Hopefully this gives you a test of what can be achieved easily with the BBC Micro:bit.

I will be following up with other articles in the future on this single board computer

Sunday 31 July 2016

What is a attack vector and what is the attack surface area

In this post I am aiming to explaining some of the common terms (such as attack vector, attack surface area) used when discussing cyber attacks in the way non-technical people can understand. In this post I'm using an example of a malicious PDF attack to explain the terms.

The scenario is an attacker sends an email with an attachment that is a malicious PDF the contains executable code if viewed on Adobe Reader, in this scenario the code will cause a denial of service.

The attacker will create a malicious payload in this scenario it is a PDF file that contains code that will take advantage of (exploit) the discovered vulnerability in a number of Adobe products. The PDF file is attached to an email which is then sent to the victim (could be a known individual in a targeted attack or to a large group of email addresses the attacker has obtained). The recipient would receive the email and the attacker is hoping that the PDF file will be opened by the recipient using a version of one of the affected Adobe products allowing the code to execute and cause a denial of service attack.

For the more technical I have based this on a actual reported vulnerability CVE-2016-1009 which affects Adobe Reader and Acrobat before 11.0.15, Acrobat and Acrobat Reader DC Classic before 15.006.30121, and Acrobat and Acrobat Reader DC Continuous before 15.010.20060 on Windows and OS X and allow attackers to execute arbitrary code or cause a denial of service (memory corruption) via unspecified vectors. [https://www.cvedetails.com/cve/CVE-2016-1009/] [https://helpx.adobe.com/security/products/acrobat/apsb16-09.html]

The scenario is illustrated in the diagram below.


The threat agent, attack, attack vector, vulnerability, exploit and attack surface area relating to this scenario are described in the table below.

Term
Definition
Example
Threat agent
an individual or group that can manifest a threat. It is fundamental to identify who would want to exploit the assets of a company, and how they might use them against the company
Attacker
Attack
Any kind of malicious activity that attempts to collect, disrupt, deny, degrade, or destroy information system resources or the information itself
Denial of Service
Attack vector
is a path or means by which a hacker (or cracker) can gain access to a computer or network server in order to deliver a payload or malicious outcome.
email
Vulnerability
Weakness in an information system, system security procedures, internal controls, or  implementation that could be exploited or triggered by a threat source.
Adobe Reader DC Classic (v15.006.30119)
Exploit
a piece of software, a chunk of data, or a sequence of commands that takes advantage of a bug or vulnerability in order to cause unintended or unanticipated behaviour to occur
Malicious PDF containing executable code that exploits CVE-2016-1009
Attack surface area
is the sum of the all vulnerabilities where an attacker can try malicious activity
All instances of the vulnerable version of Adobe Reader DC Classic (v15.006.30119)

Hopefully the scenario and the examples of what the terms mean in the context scenario help explain the usage of the terms by cyber security professionals.

In this scenario to defend themselves the victims need to identify if they are vulnerable and the attack surface area and then implement controls to remediate the vulnerability.

In order to identify if there are vulnerable organisations would need to know the software and version installed on all their assets (workstations, laptops, tablets, servers) and then monitor security feeds such as those from CERTS or Adobe to identify vulnerabilities within the assets as part of their vulnerability management programme. Alternatively they can conduct internal vulnerability assessments of their assets to identify vulnerabilities within them. This relies on the tool being able to identify the vulnerability (up to date signatures) and access rights to the assets to scan the installed software. A build review looking at security will only detect vulnerabilities within the build and not within software installed or updated by users after the build has been deployed.

Once a vulnerability has been discovered the attack surface area for that vulnerability can be identified by examining all assets for affected software.

This attack can be remediated by implementing the following

  • Software patching programme to ensure all security patches and updates are installed as soon as possible after release by vendors but after testing to ensure no unforeseen side affects
  • A vulnerability monitoring programme to identify when vulnerabilities become publicly notified
  • The use of anti-malware software with updated signatures and scanning engine to scan all incoming attachments.
  • User education to ensure users are aware of the danger of viewing attachments on unexpected emails.

These are covered by the CIS Critical Security Controls

CSC 2: Inventory of Authorized and Unauthorized Software
CSC 4: Continuous Vulnerability Assessment and Remediation
CSC 8: Malware Defenses
CSC 17: Security Skills Assessment and Appropriate Training to Fill Gaps
CSC 19: Incident Response and Management


Monday 25 July 2016

Amazon phishing scheme

Amazon phishing scheme

In this morning's email were a couple from Amazon, all but one where legitimate. The one that caught my eye was one of those that is "Too good to be true" style phishing attempts.

It was offering a chance of winning £650 of Amazon gift cards.

It has all the classic warning signs of a scam

Below I have run through some simple checks on the email and the originating domain.

The email headers below show the originating server

Return-Path: <prime@programnotice.com>
Delivered-To: ************@*****.*****
Received: from serv1-lon.mx.************.net.uk (unknown [***.1.150.142])
by mail.************.co.uk (Postfix) with ESMTP id 7C5385610F20
for <***********@*****.*****>; Mon, 25 Jul 2016 08:55:10 +0100 (BST)
Received: from pxy.b.mx.************.co.uk (pxy.b.mx.************.co.uk [***.207.220.216])
by serv1-lon.mx.************.net.uk (Postfix) with ESMTP id 6E6EC82BE83
for <************@*****.*****>; Mon, 25 Jul 2016 08:55:10 +0100 (BST)
Received: from helping.programnotice.com (unknown [142.0.69.40])
by pxy.b.mx.************.co.uk (Postfix) with ESMTP id EBA392379B8
for <************@*****.*****>; Mon, 25 Jul 2016 08:55:09 +0100 (BST)
From: "Prime Shop" <prime@programnotice.com>
To: "************@*****.*****" <************@*****.*****>
Message-ID: <CDBC2FA6.7795183@programnotice.com>
Date: Mon, 25 Jul 2016 00:55:09 -0700
Subject: Please claim your Amazon Prime shopping credit
MIME-Version: 1.0
Content-Type: text/html; charset=UTF-8; format=flowed
Content-Transfer-Encoding: 8bit

The domain programnotice.com is registered in Panama as shown below

WHOISGUARD PROTECTED
WHOISGUARD, INC.
P.O. BOX 0823-03411
PANAMA
PANAMA
00000
Panama

The email server is based in Netherlands

Meppel
KG
7942
Netherlands

An interesting point is the time stamp on the email shows a 7 hour time difference where as the Netherlands are a hour ahead and Panama 5 hours behind UTC

Whilst none of this is really informative, it is hopefully interesting enough to help people be aware of the risk from emails.

Saturday 2 July 2016

Surviving the turmoil of brexit (surviving the cybercriminals attack)

In the wake of the Brexit vote and the result for the leave campaign they has been an explosion in news reports on the UK and world economy and how companies and the markets are reacting to the vote decision along with stories of racism and harassment of individuals.

As with any news worthy event; and this is ranking at the top end of such events; the ‘proper’ media along with social media has exploded with stories and headlines capturing the eye of the individual. The result is that for the cyber-criminal there is a wealth of material to use to convincing individuals to fall for malware laden emails, drive by downloads and other attacks and both the individual and the employer is at increased risk of loss due to cyber-attack.

The material that is being generated as a result of the Brexit vote is being used as a hook to engage the individuals with the attack and what normally would be considered outlandish and ignored is now being responded to.

Attacks such as
  •  Pretexting, pretextual, blagging
  • Phishing, whaling, spear phishing, IVR and phone phishing
  •  Baiting
  • Quid pro quo
  •  419, Nigerian scams, advance fee scams

Can all be made more believable by referencing stories from or purported to be from the fallout of the Brexit vote. How many of your employees would look at an email reporting to continue information on the relocation of corporate headquarters to another European capital, or would individuals fall for news on the banking struggling to meet foreign currency demands or having sufficient funds to cover cash withdrawals.

Any such emails, news site, social media article could be well meaning or be part of a cyber-attack. Organisations and individuals can protect themselves by ensuring their or they employees are aware of the types of attacks and the risks from them.

For the organisation they should establish security frameworks of trust aimed at the employee/personnel level (i.e., specify and train personnel when/where/why/how on how social engineering attacks should be handled).

These frameworks should cover
  •  Identifying how social engineering attacks are committed
  • The type of headlines and information used to make them believable; focusing on current affairs.
  • The incident response procedures for handling such attacks, especially if they think they fell for an attack

The employees should be trained in the security frameworks, the frameworks should be tested through a strategy of both announced and unannounced, periodic tests of the security framework and the framework should be continuously reviewed as no solutions to information integrity are perfect.


Sunday 26 June 2016

Update

Just a quick update to say that I'm going to be more active in maintain this log and update the projects I have been working on and also launching some new interesting projects.

Keep an eye out for my blogs on building pen testing tools into a USB charger.

Saturday 2 April 2016

Increasing size of RAID1 on a Win7 system


Increasing size of RAID1 system drive on a Windows7 machine using a hardware raid (Intel Rapid Storage Technology) built by a Microsoft Deployment Toolkit (MDT) deployment

A stumbling block is the BDEDrive which is placed immediately after the system drive by the MDT tool; ideally this partition should be the first on the drive to save problems like this.

The BDEDrive is used by BitLocker, if you are using BitLocker then there are some additional steps to follow which are outlined at the end of this article. If you are not using BitLocker then you can delete the BDE drive as outlined in the main body of the article,

You can enter the Intel® Rapid Storage Technology option ROM by pressing Ctrl and i when prompted during POST.

Increase size of RAID1

  1. Turn off the system and remove one of the hard drives.
  2. Replace it with one of the large hard drives, ideally port 1 leaving the smaller drive on port 0
  3. Turn on the machine and ensure the RAID is set to rebuild in the diagnostic screen during POST
  4. Once booted into windows, use the Intel® Rapid Storage Technology user interface to monitor rebuild progress
  5. Once rebuilt, turn off the system and change the remaining small disk, ideally swap the large drive from port 1 to port 0 replacing the small drive and add the new large drive to port 1
  6. Turn on the machine and ensure the RAID is set to rebuild in the diagnostic screen during POST
  7. Once booted into windows, use the Intel® Rapid Storage Technology user interface to monitor rebuild progress

Deleting the BDEDrive

Before the BDEDrive can be deleted the system needs to be configured using BCDboot to replace the boot mechanism used by BDEDrive whether or not BitLocker has been enabled or not.
 BCDboot copies a small set of boot-environment files from the installed Windows image to the system partition. Next, BCDboot creates a Boot Configuration Data (BCD) store on the system partition that instructs the computer to boot to the Windows partition.

Use BCDboot tool from the command line
  • bcdboot c:\windows /s c:
You now need to make the c: active using diskpart tool.
  • diskpart
  • select disk 0
  • select part 0
  • active
Then you can delete the BDEdrive partition either using the disk management console or using diskpart.
  • diskpart
  • select disk 0
  • select part 1
  • delete partition
Reboot into windows, windows will see the smaller drive size unitl the RAID is reconfigured, using the Intel RST tool to increase the size of the existing RAID array.

Once the RAID array has been increased; progress of which can be monitored in the Intel RST tool.

Reboot into windows and using the disk management snap in increase the size of the C: drive

Do a final reboot of windows to ensure all changes have been completed successfully

What to do if you need to use BitLocker

  1. Temporarily disable BitLocker and decrypt the C: drive. Applying the chkdisk /f as required until all error are fixed.
  2. Follow the instructions in the main body of the article until you expand the C: drive, if you need to use BitLocker you will need to leave space at the end of the drive for the partition to be created; leave at least 300MB, preferably around 500MB of space when expanding the C: drive
  3. Once the system has completed its final reboot and confirmed the new size of the C: drive
  4. Re-enable BitLocker which will create a new BDEDrive partition and ask you to save the recovery key.